• My Stepfather’s Secret Stunned Me on My Birthday – But My Payback Left Him in Tears

    My Stepfather’s Secret Stunned Me on My Birthday – But My Payback Left Him in Tears

    On my 18th birthday, a letter from my late mother revealed a secret that would change my life: the man I knew as my stepfather, Stephen, was, in fact, my biological father. This revelation ignited a journey of forgiveness and a bonding experience that would deepen our connection in a way I never expected.

    Growing up, Stephen had been more than just a stepfather. After my mother’s passing when I was only ten, he became my anchor in a world that felt suddenly empty and unfamiliar. Our home was filled with silence and longing, and both Stephen and I grappled with the enormous void she left behind. He was new to parenting and uncertain how to comfort me, a young girl hurting from such a profound loss. At first, I didn’t make it easy for him.

    I was a mix of anger and grief, and Stephen became the unwitting target of my pain. Yet, despite my outbursts and frustration, he never gave up. Each evening, he’d knock gently on my door, his voice soft, “Hey, kiddo. How was school today?”

    “Fine,” I’d mutter, refusing to look up from my book. I missed my mother with an ache he could never understand, and Stephen’s well-meaning efforts only reminded me of how much I had lost.

    On tougher days, my responses would be sharper. “I want Mom, not you!” I’d snap. But Stephen held steady, his patience unwavering. He was there every night with dinner ready, made sure my homework was complete, and attended every school event—no matter how small. At first, I dismissed it, thinking he was only doing it out of a sense of duty.

    One night, after another argument about my curfew, he said something that left a mark. “I’m trying my best here, Nancy. This isn’t easy for me either.” In my frustration, I’d yelled back, “You’re not my dad! You can’t tell me what to do!”

    But his dedication never wavered. Even though I struggled to accept him, he was present, always. At every school play, every recital, every soccer game, there was Stephen, cheering me on from the sidelines. Gradually, I started to see past my anger. He wasn’t just showing up—he truly cared. And eventually, my walls began to crumble. I even found myself looking forward to his gentle knock at the door and his quiet, “How was your day, kiddo?”

    “Thanks, Stephen,” I said one night, looking him in the eye. “You didn’t have to do all of this.” He looked surprised, then smiled warmly. “I’m here because I want to be, Nancy. You’re family.”

    As I packed for college, excited yet hesitant about leaving home, Stephen entered my room with an envelope in his hand. He held it out to me, his expression tender and a bit uncertain. “This is from your mother,” he said softly. “She asked me to give it to you on your 18th birthday.”

    With a shaky hand, I opened the letter.

    “Dear Nancy,

    If you’re reading this, it means you’ve reached a milestone in life, and I couldn’t be prouder of the person you’ve become. You were the light of my life, my reason for everything, and I wish I could be there to share this moment with you.”

    The letter continued with words of love and encouragement, but then, my heart skipped as I reached a revelation that felt like a thunderclap.

    “I need you to know the truth: Stephen isn’t just your stepfather; he’s your real father. When I found out I was pregnant, he was scared, unprepared for the responsibility. He left, and I raised you alone for nearly ten years. But when he returned, he was filled with regret, and I knew he was ready to be part of your life again. I didn’t want to confuse you, so I let you believe he was a new part of our lives. But now that you’re old enough, I think you deserve to know.”

    I looked up at Stephen, emotions swirling inside me. He seemed so vulnerable, waiting for my reaction, his face filled with an earnestness I hadn’t seen before. “Nancy,” he began, voice trembling, “I didn’t know how to tell you. I’m sorry for the hurt my absence caused. I’ve spent every day since I returned trying to make it right.”

    Suddenly, the years of his dedication made sense. “You didn’t have to be perfect, Stephen. You’ve already been a great dad.”

    He looked stunned, then his eyes filled with tears. “Thank you, Nancy. Hearing that means everything.”

    I had an idea. “You know what? Pack a bag,” I said, smiling through my own tears. “We’re going on a trip—a father-daughter vacation.”

    With money from my trust fund, I had booked us a week at an oceanfront resort, a thank-you for everything he’d done. As we boarded the plane and watched the world stretch out below, the weight of our past seemed to lift, replaced by excitement and gratitude.

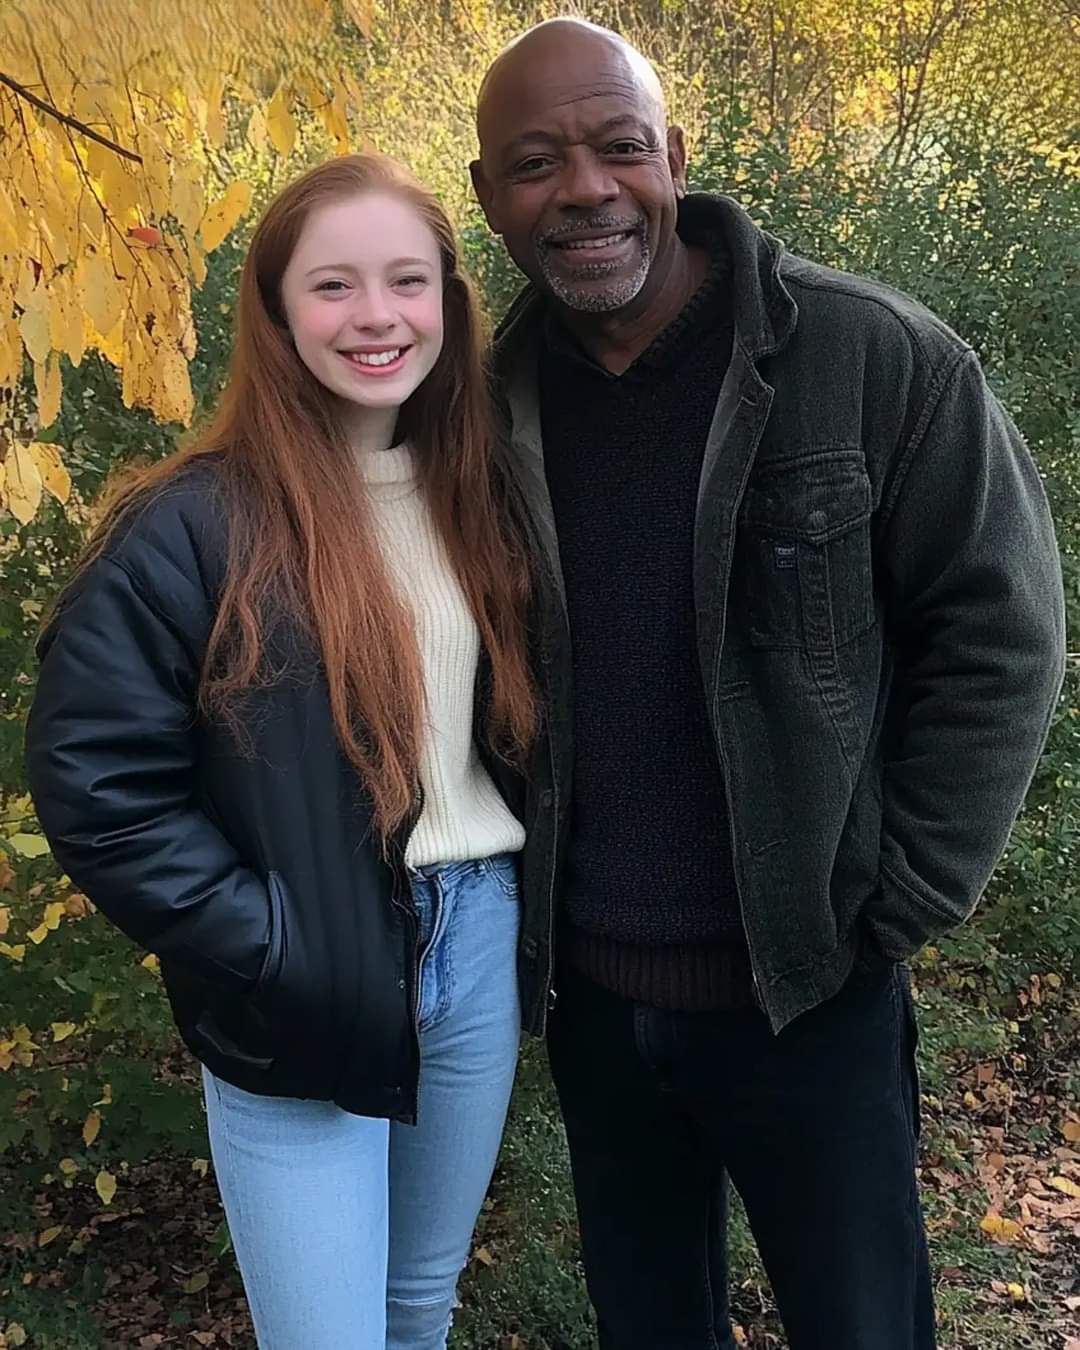
    On our first night, we sat by the water, listening to the waves. Stephen opened up, finally sharing his struggles and regrets. “Leaving was the worst mistake of my life. But I thought I could never make it right. I’m so sorry for missing those early years.” I held his hand, tears welling up. “I forgive you, Dad. You came back. That’s what matters.”

    The week was filled with memories. We took boat tours, snorkeled among fish, and even shared fancy dinners by the beach. We laughed together in ways I’d never thought possible, and for the first time, I felt a sense of peace and wholeness.

    As I looked at Stephen, who was now truly my father in every sense, I realized just how far we had come. He was no longer the “stepfather” trying to fit into my life. He was my dad, in every meaningful way, and I was grateful for him.

    This journey taught me the power of forgiveness and the importance of family. It was a week of healing, laughter, and new beginnings—a reminder that family isn’t always perfect, but with love and understanding, even the most complicated relationships can become whole. As I prepared for college and new adventures, I carried that bond with me, knowing that Stephen would always be there, not just as a father figure, but as my true dad.

  • Slow Cooker Mississippi Meatballs Recipe

    Slow Cooker Mississippi Meatballs are a delicious and easy-to-make dish that combines tender meatballs with a flavorful sauce. The recipe typically includes frozen or homemade meatballs, a packet of ranch dressing mix, a packet of au jus gravy mix, and a stick of butter.

    Here’s a simple way to prepare them:

    1. Ingredients:
    • 2 pounds of frozen or homemade meatballs
    • 1 packet of ranch dressing mix
    • 1 packet of au jus gravy mix
    • 1 stick of butter
    • Optional: sliced pepperoncini peppers for added flavor
    1. Instructions:
    • Place the meatballs in the slow cooker.
    • Sprinkle the ranch dressing mix and au jus gravy mix over the meatballs.
    • Cut the stick of butter into pieces and place them on top of the meatballs.
    • If you’re using pepperoncini, you can add them now.
    • Cover and cook on low for about 6-8 hours or on high for 3-4 hours, until the meatballs are heated through and the flavors meld together.
    1. Serving:
    • Serve the meatballs as an appetizer with toothpicks or over rice, pasta, or in a sandwich.

    You can definitely add other spices to enhance the flavor of Slow Cooker Mississippi Meatballs. Here are some ideas:

    1. Garlic Powder: Adds a nice savory depth.
    2. Onion Powder: Gives a subtle sweetness and richness.
    3. Black Pepper: Adds a bit of heat and complexity.
    4. Paprika: For a smoky flavor, you can use either sweet or smoked paprika.
    5. Red Pepper Flakes: If you like a bit of spice, this can add some heat.
    6. Italian Seasoning: A blend of herbs that can complement the dish well.

    Feel free to adjust the amounts based on your taste preferences! Just sprinkle them over the meatballs along with the ranch and au jus mixes before cooking.

    This dish is known for its rich and savory flavors, making it a crowd-pleaser! Enjoy experimenting with the spices to enhance the flavors even more!

  • As soon as my mom tasted it, she rushed over to get this recipe from me.

    These classic patty melts are elevated with a secret sauce and caramelized onions. The combination of flavors and textures is simply irresistible!

    Ingredients:

    For the Patty Melts:

    IngredientQuantity
    Ground beef1 lb
    Onion, thinly sliced1 large
    Rye bread8 slices
    Swiss cheese4 slices
    Cheddar cheese4 slices
    ButterFor grilling
    Salt and pepperTo taste

    For the Secret Sauce:

    IngredientQuantity
    Mayonnaise1/2 cup
    Ketchup2 tablespoons
    Sweet pickle relish1 tablespoon
    Worcestershire sauce1 teaspoon

    Instructions:

    1. Make the Secret Sauce: Combine mayonnaise, ketchup, sweet pickle relish, and Worcestershire sauce in a small bowl. Mix well and set aside.
    2. Caramelize the Onions: Melt butter in a large skillet over medium heat. Add sliced onions and cook, stirring occasionally, until caramelized (15-20 minutes). Remove from heat and set aside.
    3. Cook the Patties: Divide  ground beef into 4 portions and shape into thin patties. Season with salt and pepper. Cook in the same skillet over medium-high heat until cooked through (3-4 minutes per side). Remove and set aside.
    4. Assemble the Patty Melts: Butter one side of each rye bread slice. Place 4 slices, butter-side down, on a skillet or griddle over medium heat.
    5. Layer the Ingredients: Top each bread slice with Swiss cheese, a cooked patty, caramelized onions, cheddar cheese, and another bread slice (butter-side up).
    6. Cook and Serve: Cook until golden brown and cheese is melted (2-3 minutes per side). Remove from heat, let rest for a minute, slice in half, and serve with the secret sauce.

    Bon appétit .

  • Loaded Cheesy Pocket Tacos recipe

    Loaded Cheesy Pocket Tacos are like regular tacos, but with a fun twist! It’s basically a taco filling wrapped in a pocket of cheesy goodness. Here’s a simple recipe for you to try making them:

    Ingredients:

    • 1 pound  ground beef
    • 1 packet taco seasoning
    • 1 can (10 oz) diced tomatoes with green chilies, drained
    • 1 can (4.5 oz) chopped green chilies, drained
    • 1 can (16 oz) refried beans
    • 2 cups shredded cheese (cheddar or Mexican blend)
    • 1 package large flour tortillas
    • Optional toppings: sour cream, salsa, avocado, lettuce

    Instructions:

    1. Cook the Beef: In a skillet, cook the ground beef over medium heat until browned. Drain excess fat. Add the taco seasoning, diced tomatoes, and green chilies. Mix well and simmer for a few minutes.
    2. Prepare the Pocket Tacos: Lay out a flour tortilla and spread a spoonful of refried beans in the center. Top with a scoop of the beef mixture and a sprinkle of shredded cheese.
    3. Fold and Cook: Fold the sides of the tortilla over the filling to create a pocket. Place the pocket taco seam side down on a skillet over medium heat. Cook until the tortilla is crispy and the cheese is melted.
    4. Serve: Remove from the skillet and let them cool slightly. Serve with your favorite toppings like sour cream, salsa, avocado, or lettuce.

    You can definitely add different toppings to these tacos! Some great options include:

    • Sour Cream: Adds creaminess and balances the flavors.
    • Salsa: Fresh or jarred salsa can add a nice kick.
    • Guacamole: Creamy avocado enhances the taste.
    • Chopped Lettuce: Adds crunch and freshness.
    • Diced Tomatoes: For a fresh, juicy element.
    • Jalapeños: If you like heat, fresh or pickled jalapeños are a great choice.
    • Cilantro: Adds a fresh, herbal flavor.

    Feel free to mix and match your favorites to create the perfect loaded cheesy pocket tacos! Enjoy experimenting with different flavors!

    These Loaded Cheesy Pocket Tacos are a fun and delicious twist on traditional tacos. Enjoy making and eating them!

  • Tex-Mex Beef Enchiladas

    Tex-Mex Beef Enchiladas

    Savor the bold taste of Tex-Mex with our Beef Enchiladas. Featuring seasoned ground chuck, vibrant veggies, and a zesty Red Hot Enchilada sauce, these rolled delights are baked to cheesy perfection. Dive into a quick and easy recipe that brings the essence of Tex-Mex cuisine to your table. Enjoy the burst of flavors in every bite!

    Ingredients:

    IngredientsQuantity
    Coarse ground chuck2-3 lb.
    Cooking oil2 Tbsp
    Medium white onion1
    Jalapeno or serrano peppers2-3 medium
    Fresh cilantro1/3 bunch
    Chili powder1 Tbsp
    Smoked paprika1 Tbsp
    Sea salt1 tsp
    Ground black pepper1 tsp
    Homemade corn or flour tortillas12+ (links in comments or store-bought)
    Grated Monterey jack cheese1 cup
    Grated Mexican blend cheese1 cup

    Instructions:

    1. Prepare Red Hot Enchilada Sauce:
      • Follow your preferred recipe to make the enchilada sauce. Set aside.
    2. Preheat Oven:
      • Preheat the oven to 175°C (350°F).
    3. Vegetable Mixture:
      • Peel and slice the onion.
      • In a food processor, combine sliced onion, jalapeno/serrano peppers, cilantro, and bay leaves. Pulse until minced.
    4. Cheese Mix:
      • In a small bowl, mix Monterey Jack and Mexican blend cheeses.
    5. Cook Ground Chuck:
      • Heat oil in a skillet over medium-high heat.
      • Add chili powder, smoked paprika, ground chuck, salt, and pepper.
      • Stir and cook until ground chuck turns grey.
      • Add minced vegetable mixture, cook for 2 minutes, then remove from heat.
    6. Prepare Tortillas:
      • Heat tortillas in the microwave (6 at a time) until soft.
    7. Assembly:
      • Spoon meat mixture onto a tortilla, sprinkle with cheese mix, and roll. Repeat for all tortillas.
    8. Baking Dish:
      • Apply cooking spray to a 9×13-inch baking dish.
      • Place rolled tortillas in the dish.
    9. Enchilada Sauce and Cheese:
      • Pour enchilada sauce over the tortillas.
      • Sprinkle remaining cheese on top.
    10. Bake:
      • Bake in the preheated oven for 25-30 minutes until cheese is melted and golden.
    11. Serve:
      • Remove from the oven, let it cool slightly, and serve. Enjoy your Tex-Mex Beef Enchiladas!

  • Tried this recipe out twice and it was a hit on both occasions!

    Tried this recipe out twice and it was a hit on both occasions!

    This hearty and flavorful  slow cooker lasagna is a delicious and easy-to-make dish. The combination of ground beef, marinara sauce, and cheesy ravioli creates a satisfying and comforting meal.

    Ingredients:

    IngredientQuantity
    Ground beef1 pound
    Onion, chopped1 small
     Garlic, minced3 cloves
    Marinara or pasta sauce1 jar (24 oz)
    Diced tomatoes1 can (14.5 oz), drained
    Dried oregano1 teaspoon
    Dried basil1 teaspoon
    Salt1/2 teaspoon
    Black pepper1/2 teaspoon
    Frozen cheese ravioli1 package (25 oz)
    Mozzarella cheese, shredded2 cups
    Parmesan cheese, grated1/2 cup
    Ricotta cheese1 cup (optional)
    Fresh basil or parsley, choppedFor garnish

    Instructions:

    1. Cook ground beef: In a large skillet, cook ground beef over medium heat until browned. Add chopped onion and minced garlic. Cook until onion is softened. Drain any excess fat.
    2. Prepare meat sauce: Add marinara sauce, diced tomatoes, oregano, basil, salt, and pepper to the skillet. Stir to combine and bring to a simmer. Cook for 5 minutes.
    3. Assemble lasagna: Lightly grease slow cooker. Spread a thin layer of meat sauce on the bottom. Place a layer of frozen cheese ravioli over the meat sauce. Spoon meat sauce over the ravioli layer. If using, add ricotta cheese. Sprinkle with mozzarella and Parmesan cheese. Repeat layers until all ingredients are used.
    4. Cook lasagna: Cover and cook on low for 4-5 hours or on high for 2-3 hours, or until ravioli is tender and cheese is melted and bubbly.
    5. Serve: Let lasagna sit for 10 minutes before serving. Garnish with fresh basil or parsley. Serve hot with a side salad or garlic bread.

  • Loaded Cheesy Pocket Tacos recipe

    Loaded Cheesy Pocket Tacos recipe

    Loaded Cheesy Pocket Tacos are like regular tacos, but with a fun twist! It’s basically a taco filling wrapped in a pocket of cheesy goodness. Here’s a simple recipe for you to try making them:

    Ingredients:

    • 1 pound ground beef
    • 1 packet taco seasoning
    • 1 can (10 oz) diced tomatoes with green chilies, drained
    • 1 can (4.5 oz) chopped green chilies, drained
    • 1 can (16 oz) refried beans
    • 2 cups shredded cheese (cheddar or Mexican blend)
    • 1 package large flour tortillas
    • Optional toppings: sour cream, salsa, avocado, lettuce

    Instructions:

    1. Cook the Beef: In a skillet, cook the ground beef over medium heat until browned. Drain excess fat. Add the taco seasoning, diced tomatoes, and green chilies. Mix well and simmer for a few minutes.
    2. Prepare the Pocket Tacos: Lay out a flour tortilla and spread a spoonful of refried beans in the center. Top with a scoop of the beef mixture and a sprinkle of shredded cheese.
    3. Fold and Cook: Fold the sides of the tortilla over the filling to create a pocket. Place the pocket taco seam side down on a skillet over medium heat. Cook until the tortilla is crispy and the cheese is melted.
    4. Serve: Remove from the skillet and let them cool slightly. Serve with your favorite toppings like sour cream, salsa, avocado, or lettuce.

    You can definitely add different toppings to these tacos! Some great options include:

    • Sour Cream: Adds creaminess and balances the flavors.
    • Salsa: Fresh or jarred salsa can add a nice kick.
    • Guacamole: Creamy avocado enhances the taste.
    • Chopped Lettuce: Adds crunch and freshness.
    • Diced Tomatoes: For a fresh, juicy element.
    • Jalapeños: If you like heat, fresh or pickled jalapeños are a great choice.
    • Cilantro: Adds a fresh, herbal flavor.

    Feel free to mix and match your favorites to create the perfect loaded cheesy pocket tacos! Enjoy experimenting with different flavors!

    These Loaded Cheesy Pocket Tacos are a fun and delicious twist on traditional tacos. Enjoy making and eating them!

  • CHEESY TACO CREAM CHEESE PASTA

    CHEESY TACO CREAM CHEESE PASTA

    Oh, Cheesy Taco Cream Cheese Pasta is a delicious dish that combines the flavors of tacos with creamy pasta goodness! It’s like having your favorite taco in pasta form.

    Ingredients:

    • 8 ounces pasta (like penne or rotini)
    • 1 pound ground beef or turkey
    • 1 packet taco seasoning
    • 1 can (10 oz) diced tomatoes with green chilies, drained
    • 1 cup cream cheese (softened)
    • 1 cup shredded cheese (cheddar or Mexican blend)
    • 1 cup milk
    • Optional toppings: chopped green onions, cilantro, or extra cheese

    Instructions:

    1. Cook the Pasta: Boil the pasta according to package instructions until al dente. Drain and set aside.
    2. Cook the Meat: In a large skillet, cook the ground beef or turkey over medium heat until browned. Drain any excess fat.
    3. Add Seasoning: Stir in the taco seasoning and diced tomatoes. Cook for a few minutes until heated through.
    4. Make it Creamy: Reduce the heat to low and add the cream cheese and milk to the skillet. Stir until the cream cheese is melted and the mixture is creamy.
    5. Combine: Add the cooked pasta to the skillet and mix well to combine everything. Stir in the shredded cheese until melted and everything is well coated.
    6. Serve: Serve hot and garnish with optional toppings like chopped green onions or cilantro.

    Enjoy your Cheesy Taco Cream Cheese Pasta! It’s a comforting and flavorful dish perfect for any taco lover!

  • 16-Pound Giant Baby Made Headlines In 1983, But Wait Till You See Him Today

    16-Pound Giant Baby Made Headlines In 1983, But Wait Till You See Him Today

    In 1983, when 24-year-old Patricia Clarke became pregnant, she had more than a hunch that her unborn child would be big.

    She was aware that large families were in her family because she had previously given birth to one. Although, the sheer size of the baby she was carrying was completely unexpected.

    Kevin Robert Clark was born to Patricia, and he measured in at over 16 pounds—an enormous baby. He was the largest infant ever born at Community Memorial Hospital and maybe all of New Jersey at the time.

    His parents were relieved to see that Kevin was absolutely healthy, even though he couldn’t fit into a standard-sized cot and his baby clothes were too small.

    As one could expect, his stature was immediately apparent. His national fame skyrocketed after he was featured on “Saturday Night Live” and “Good Morning America,” among other shows.

    Begin by setting a good example.

    Unfortunately, Kevin wasn’t finished taking center stage just yet. He was 5 feet and 7 inches tall when he was 12 years old, according to the New York Post.

    Upon entering junior high, he had grown to a height of 6 feet and 5 inches. He continued to develop more after that.

    “There isn’t a day that goes by when someone doesn’t ask me how tall I am,” Kevin told the Post.

    “I like to joke that I’m 5-foot-21. When people ask if I play basketball, I ask them if they play miniature golf.”

    Today, Tom’s age is 40. His 6-foot-tall wife and Great Dane make their home with him; he is a former soldier.

    Being taller than other people is just something he has gotten used to. Actually, he does it with his enormous stride. Tom recently measured 6 feet 9 inches in height.

    Watch the video down below to learn more about his amazing story:

    Coming into the spotlight at birth and spending much of your childhood with people staring at you and asking questions must be challenging.

    However, it appears that Kevin is coping quite well… As he moves forward, we hope for the best for him!

    Please SHARE this story with Family and Friends!

  • My hubby is beyond addicted to this stuff! We finish one serving and he’s asking when I can make it again

    My hubby is beyond addicted to this stuff! We finish one serving and he’s asking when I can make it again

    This Italian Meatloaf recipe delivers robust flavors and a juicy texture, perfect for a comforting weeknight meal. The combination of ground meat, fresh herbs, and cheesy marinara topping makes it a crowd-pleaser.

    IngredientQuantity
    Ground Beef (or mix of beef and pork)1 1/2 pounds
    Breadcrumbs1 cup
    Grated Parmesan Cheese1/2 cup
    Whole Milk1/2 cup
    Finely Diced Onion1/2 cup
    Finely Diced Bell Pepper (red or green)1/4 cup
    Minced  Garlic2 cloves
    Chopped Fresh Parsley1/4 cup
    Chopped Fresh Basil1/4 cup
    Dried Oregano1 teaspoon
    Dried Thyme1 teaspoon
    Salt1 teaspoon
    Black Pepper1/2 teaspoon
    Large Eggs2

    For the Topping:

    IngredientQuantity
    Marinara Sauce1/2 cup (for topping)
    Shredded Mozzarella Cheese1/2 cup
    Fresh Basil Leaves (optional, for garnish)

    Instructions:

    1. Preheat and Prep (10 minutes):
      • Preheat your oven to 350°F (175°C).
      • In a small bowl, combine the breadcrumbs and milk. Let them sit for a few minutes to soften.
    2. Mix the Meatloaf (10 minutes):
      • In a large bowl, combine the ground meat, soaked breadcrumbs, Parmesan cheese, diced onion, diced bell pepper, minced garlic, chopped parsley, chopped basil, oregano, thyme, salt, and pepper.
      • Add the eggs and mix gently until everything is well combined. Avoid overmixing to prevent a tough texture.
    3. Form and Bake (1 hour):
      • Shape the meatloaf mixture into a loaf and place it in a greased or parchment-lined baking dish.
      • Pour 1/2 cup of marinara sauce over the top.
      • Bake the meatloaf in the preheated oven for 45 minutes.
    4. Add Cheesy Topping and Finish Baking (20 minutes):
      • Take out the meatloaf and spread the remaining marinara sauce evenly.
      • Top with shredded mozzarella cheese.
      • Return the meatloaf to the oven and bake for an additional 15-20 minutes, or until the internal temperature reaches 160°F (71°C) and the cheese is melted and bubbly.
    5. Serve and Enjoy (5 minutes):
      • Remove the Italian Meatloaf from the oven and let it rest for a few minutes before slicing.
      • Garnish with fresh basil leaves (optional) and serve with your favorite sides.