• Creamy Paprika Steak Shells

    Creamy Paprika Steak Shells

    This Creamy Paprika Steak Shells recipe brings together tender steak bites, smoky paprika, and a rich garlic-Parmesan cream sauce for a comforting and flavorful meal. The steak is seared until golden, releasing savory juices that blend beautifully with melted butter, garlic, and a touch of smoked paprika. Heavy cream and Parmesan are then stirred in, creating a silky, flavorful sauce that clings perfectly to the pasta shells.

    The shells, cooked until al dente, soak up the creamy sauce and tender steak pieces, making each bite rich and satisfying. A sprinkle of crushed red pepper adds a gentle kick, while fresh parsley gives the dish a pop of color and brightness.

    This meal is easy to make yet tastes like something from a fine restaurant. It’s perfect for weeknights when you want something hearty and impressive without much effort. Serve it with a side salad or garlic bread for a complete, cozy dinner that everyone will love.

    Ingredients:

    IngredientQuantity
    Shell pasta12 oz
    Steak (sirloin or ribeye), cut into bite-sized pieces1 lb
    Salt and black pepperTo taste
    Olive oil1 tablespoon
    Butter1 tablespoon
    Garlic, minced3 cloves
    Smoked paprika (divided)1 1/2 teaspoons
    Heavy cream1 cup
    Beef broth1/2 cup
    Grated Parmesan cheese1/2 cup
    Chopped fresh parsleyFor garnish

    How To Make Creamy Paprika Steak Shells:

    1. Step 1: Cook Pasta: Cook the 12 oz shell pasta in a large pot of salted water according to package directions until al dente. Drain and set aside.
    2. Step 2: Season Steak: Meanwhile, season the 1 lb steak pieces generously with salt, pepper, and 1 teaspoon of the smoked paprika, tossing to coat evenly.
    3. Step 3: Sear Steak: Heat the 1 tablespoon olive oil in a large skillet set over medium-high heat. Once hot, add the steak bites and sear for 2-3 minutes per side, until deeply browned but still tender inside. Remove the steak to a plate and set aside.
    4. Step 4: Sauté Garlic and Paprika: Reduce the heat to medium and add the 1 tablespoon butter to the same skillet. Once melted, add the 3 cloves minced garlic and sauté for about 1 minute, just until fragrant. Stir in the remaining 1/2 teaspoon smoked paprika.
    5. Step 5: Make the Sauce: Pour in the 1 cup heavy cream and 1/2 cup beef broth, stirring to combine and scraping up any browned bits left from the steak. Let the mixture come to a gentle simmer, and cook for 3-4 minutes until the sauce slightly thickens.
    6. Step 6: Add Cheese: Stir in the 1/2 cup grated Parmesan cheese until fully melted and the sauce is creamy and smooth.
    7. Step 7: Combine and Serve: Add the cooked pasta shells and steak pieces back to the skillet. Gently toss everything together until the pasta and steak are evenly coated in sauce. Remove from heat, sprinkle with chopped fresh parsley, and serve piping hot.

  • How to Make Crispy Ground Beef Tacos

    How to Make Crispy Ground Beef Tacos

    If you are looking for a quick but tasty lunch or dinner meal, then this Crispy Ground Beef Tacos recipe is the answer. Consisting of a ground beef filling seasoned with a flavorful blend of spices and melty mozzarella cheese enclosed in a flour tortilla that is fried to crispy golden brown perfection, these tacos are absolutely delicious! To make this recipe, you will need the key ingredients shared below. 

    Key ingredients

    • Ground Beef
    • Onions 
    • Flour Tortillas 
    • Mozzarella Cheese
    • Taco Seasoning 
    • Tomato Paste 
    • Oil of Choice 

    Preparation 

    • Make Beef Filling – heat some oil in a large skillet over medium heat. Add in the onions and cook until softened, about 2-3 minutes. Add in the beef. Use a large spoon to break up the beef and cook until it is mostly browned. Mix in the tomato paste and then the taco seasoning. Stir in the water (or beef broth) if filling appears dry and continue to cook until the beef is fully cooked through and most of the cooking liquid has evaporated, about 3-4 minutes. Taste the filling and season with salt, if needed. Remove from heat and set aside.
    • Assemble Tacos – on a clean work surface, place down a tortilla. On the top half of the tortilla, add some mozzarella cheese, about (about 1 1/2 to 2 tablespoons). Spoon over a portion of the beef filling and top with some more cheese (about 1 1/2 to 2 tablespoons). Fold the bottom half of the tortilla over the filling and gently press down to seal. Transfer to a large baking sheet and repeat with remaining beef filling, cheese and tortillas for a total of (8) tacos. 
    • Fry tacos – heat up some oil (about 3-4 tablespoons) in a large skillet over medium heat. In batches, pan fry the tacos, about 1 minute per side, until golden brown. Transfer to a wire cooling rack placed over a baking sheet. If needed, add additional oil in between frying the batches of tacos to ensure that you get nicely golden brown and crispy tacos. 
    • Serve – tacos immediately while still hot and crispy with sauce of choice. I served tacos with this homemade Creamy Cilantro Lime Sauce Recipe
    Crispy Ground Beef Tacos

    If you tried these Crispy Ground Beef Tacos, please let me know how you liked it with a rating and comment! I’d love to know what you think of this recipe? Feel free to also leave any questions there about this recipe and I’ll get right back to to you.

  • K9 Dog Saves Groom from Deceptive Bridge – Her Hidden Past…

    K9 Dog Saves Groom from Deceptive Bridge – Her Hidden Past…

    What was meant to be the happiest day of their lives turned into a moment of near-tragedy… until a heroic K9 stepped in.

    It was a sunny afternoon in late spring, and guests had gathered in a beautifully decorated garden to celebrate the union of Emily and James. With petals gently falling from above and birds chirping in the background, everything seemed perfect. But beneath the surface of this picturesque wedding was a silent danger—one that no one expected, except a  dog with a hidden past.

    The ceremony was scheduled to take place at the far side of the garden, just across a charming wooden bridge built over a decorative pond. It was the bride’s favorite spot, chosen specifically for the magical setting. But the structure had weakened over time—unbeknownst to anyone, the center planks had rotted from within.

    As the groom, James, walked toward the bridge to greet a group of arriving guests, his loyal German Shepherd, Bella, stiffened beside him. Bella wasn’t just any dog—she was a retired K9 who had served in multiple search-and-rescue missions and had saved more than a few lives. Her instincts were sharp. Her loyalty, unmatched.

    Suddenly, Bella growled and barked, tugging fiercely at James’s pant leg. Surprised, he stopped mid-step—just as the center of the bridge collapsed under its own weight, plunging a section of wood into the shallow water below. Had he taken just two more steps, James would have been injured or worse.

    Gasps filled the air. Guests screamed. The bride, Emily, dropped her bouquet in shock.

    But Bella didn’t panic. She stood firm, placing herself protectively between James and the broken bridge, ears alert, eyes focused. Only then did everyone realize what had almost happened.

    The K9 With a Hidden Past

    Bella had been adopted by James two years earlier after retiring from active service. Her records were classified, and James only knew fragments of her history—she had served overseas, been injured in an avalanche, and once sniffed out survivors beneath earthquake rubble.

    What no one knew until now was that Bella had a unique ability: she could sense structural weaknesses, possibly due to trauma from a collapsed building during one of her earliest missions. It had been this finely honed instinct that saved James’s life.

    After the incident, one of the guests—a structural engineer—inspected the bridge. His verdict: “It would have snapped under a human’s full weight. That dog saved your life.”

    A Wedding Remembered for More Than Love

    The wedding went on, moved to the other side of the garden. Emily and James said their vows with Bella lying peacefully at their feet. The guests gave her a standing ovation, and later, the couple honored her with a special collar inscribed: “Hero. Protector. Family.”

    Today, Bella is more than a beloved pet. She is a reminder that sometimes, the past—no matter how hidden—can resurface in ways that change lives forever.

    📌 Disclaimer:

    This story is a fictional narrative created for entertainment purposes. The characters and events are not based on real individuals, and the accompanying image is AI-generated to illustrate the story visually.

  • One Hour Ago Mhoni Vidente WARNED About a Massive Omen in the Sky – And Then This Happened…

    One Hour Ago Mhoni Vidente WARNED About a Massive Omen in the Sky – And Then This Happened…

    In a shocking turn of events earlier today, thousands of people were left stunned as a massive black cloud of birds suddenly appeared in the sky over a major highway, just one hour after a widely followed prediction by Mexican psychic Mhoni Vidente.

    Eyewitnesses captured eerie footage showing what looked like a storm at first—but instead, it was an enormous swarm of birds, moving in haunting, synchronized patterns across the gray sky. The unsettling moment caused traffic to slow to a crawl, with drivers pulling out their phones to record what many described as “a warning from nature.”

    ⚠️ The Prophecy That Sent Chills

    Just an hour before the strange sighting, Mhoni Vidente, known for her highly publicized visions and predictions, had taken to social media to warn of a “dark aerial sign” that would be visible above a city and would signal a time of change, tension, and unexpected revelation.

    Although skeptics dismissed the message at first, the surreal video taken shortly after her announcement has reignited public debate about whether such prophetic statements should be taken more seriously.

    Birds or Bad Omen?

    Experts in animal behavior suggest that large bird murmurations like this are usually triggered by changes in air pressure, weather, or predator threats. However, the sheer scale and timing of this event have left even scientists puzzled.

    “When we see such unusual behavior from animals, especially in densely populated urban environments, it may indicate something deeper—possibly seismic or atmospheric changes,” explained Dr. Maria Estrada, an environmental researcher based in Barcelona.

    Social Media Reactions

    Users across TikTok, Instagram, and Facebook flooded the internet with clips of the bird swarm, many captioning it with phrases like “end times?” or “is this the sign she warned about?”

    One post that went viral showed the flock moving above the cars while an emergency broadcast-style caption played over the screen. Within minutes, hashtags like #BirdOmen and #MhoniWasRight started trending.

    Is This Just the Beginning?

    Whether you believe in prophecies or not, there’s no denying the strange synchronicity between the psychic warning and the apocalyptic imagery caught on video. Could it be coincidence, or are we witnessing a deeper connection between nature and foresight?

    For now, all we can do is stay alert and watch the skies.

    📌 Disclaimer: This article is for entertainment purposes only. It is inspired by fictional or speculative events. The image used is AI-generated and does not depict a real scene.

  • Relations and Tensions Between Iran and Israel

    Relations and Tensions Between Iran and Israel

    Iran and Israel have had hostile relations for decades. Before 1979, under the Shah of Iran, the two countries had relatively normal diplomatic and economic relations. However, after the Iranian Islamic Revolution in 1979, the new Iranian government adopted a strongly anti-Israel position.

    Since then, Iran has refused to recognize Israel as a legitimate state and has frequently criticized its government. Israeli leaders, on the other hand, consider Iran a major security threat, especially because of Iran’s nuclear program and its support for armed groups in the region.

    One of the main sources of tension is Iran’s support for groups such as Hezbollah in Lebanon and Hamas in Gaza, which are in conflict with Israel. Israel has carried out airstrikes in Syria and elsewhere targeting Iranian military positions and weapons shipments.

    In recent years, tensions have increased due to cyberattacks, covert operations, and direct missile and drone exchanges. Although the two countries do not share a border, they are engaged in what many analysts describe as a “shadow war” across the Middle East.

    The situation remains highly sensitive, as any direct large-scale confrontation could lead to wider regional conflict.

  • Amish Hamburger Steak Bake

    Amish Hamburger Steak Bake

    This comforting Amish Hamburger Steak Bake is a hearty, home-style dish that brings warmth and nostalgia to the dinner table. It begins with simple ingredients—lean ground beef, onions, breadcrumbs, and classic seasonings like salt, black pepper, and garlic powder—mixed together to form thick, flavorful patties. These patties are browned in a skillet until they develop a golden, slightly crisp crust on the outside while staying juicy and tender inside. The aroma alone fills the kitchen with that unmistakable homemade comfort that defines traditional Amish cooking.

    Once the patties are perfectly seared, they are carefully arranged in a baking dish and smothered with a rich, velvety sauce made from cream of mushroom soup, milk, and a touch of Worcestershire sauce. The gravy soaks into the beef as it bakes, deepening the flavor and creating that melt-in-your-mouth tenderness that makes this dish so satisfying. As it bakes slowly in the oven, the sauce bubbles gently around the patties, turning into a thick, creamy coating that clings to each bite.

    The final result is a dish that tastes like something straight out of a farmhouse kitchen—a perfect balance of savory beef, creamy gravy, and rustic comfort. Many families enjoy serving it with buttery mashed potatoes or fluffy egg noodles to soak up every bit of the delicious sauce. Others prefer pairing it with Amish egg noodles or homemade dinner rolls, creating a full meal that feels both old-fashioned and incredibly comforting.

    For added flavor, some variations include caramelized onions layered over the patties before baking, or a sprinkle of paprika and parsley on top for a pop of color and taste. You can also substitute the cream of mushroom soup with cream of chicken or even make your own homemade sauce using heavy cream and sautéed mushrooms for a richer version.

    Leftovers, if you’re lucky enough to have any, taste even better the next day as the flavors continue to deepen. It’s one of those dishes that brings people back to the table not just for the food, but for the sense of comfort and togetherness it creates.

    The Amish Hamburger Steak Bake is a perfect reminder that sometimes, the simplest ingredients can create the most satisfying meals—rich in flavor, full of heart, and meant to be shared with family around a warm table.

    Ingredients:

    IngredientQuantity
    Ground beef2 pounds
    Saltine crackers, crumbled1 1/2 cups
    Milk (for beef mixture)1 cup
    Italian herbs1 tsp
    Onion powder1 tsp
    Garlic powder1 tsp
    Cayenne pepperDash (optional)
    All-purpose flour1/2 cup
    Salt and freshly ground pepperTo taste
    Condensed cream of mushroom soup1 can (10.5 ounces)
    Milk (for gravy)1 cup

    How To Make Amish Hamburger Steak Bake:

    1. Step 1: Preheat and Prepare Pan: Preheat your oven to 1350∘F(175∘C).2 Lightly grease a 39×13-inch baking dish.4
    2. Step 2: Prepare Beef Mixture: In a large bowl, combine the 2 pounds ground beef, 1 1/2 cups crumbled saltine crackers, 1 cup milk, 1 tsp Italian herbs, 1 tsp onion powder, 1 tsp garlic powder, cayenne pepper (optional), salt, and pepper. Mix until all ingredients are evenly incorporated.
    3. Step 3: Form and Flour Steaks: Form the beef mixture into 1/2-inch-thick patties. This recipe should yield about 8 evenly-sized steaks. Lightly coat each steak in 1/2 cup flour, tapping off any excess.
    4. Step 4: Brown the Steaks: Heat a skillet over medium-high heat, adding a bit of oil if needed. Brown the steaks on each side until they develop a golden crust, about 2-3 minutes per side.
    5. Step 5: Assemble for Baking: Place the browned steaks in the greased baking dish, arranging them in a single layer.
    6. Step 6: Prepare and Add Gravy: In a separate bowl, whisk together the 1 can condensed cream of mushroom soup and the remaining 1 cup of milk until smooth. Pour the gravy evenly over the steaks.
    7. Step 7: Bake: Cover the dish with foil and bake for 30 minutes. Remove the foil and bake for an additional 10 minutes, or until the gravy is bubbling and the steaks are fully cooked through.
    8. Step 8: Rest and Serve: Let the dish rest for a few minutes before serving. Serve the hamburger steaks hot, traditionally with mashed potatoes or over rice.
  • No-Bake Caramel Chocolate Cheesecake

    No-Bake Caramel Chocolate Cheesecake

    Ingredients For the crust:

    • 2 cups chocolate cookie crumbs (like Oreo, without filling)

    • 1/2 cup melted butter For the filling:

    • 2 cups cream cheese (softened)

    • 1 can (397g) sweetened condensed milk

    • 1 tsp vanilla extract

    • 1 envelope (10g) unflavored gelatin

    • 1/4 cup warm water For the topping:

    • 1/2 cup caramel sauce

    • 1/2 cup chocolate chips

    • 1/4 cup chopped nuts (optional) ⸻ Instructions

    1. Make the crust:

    Mix cookie crumbs with melted butter.Press firmly into a springform pan. Refrigerate for 30 minutes.

    2. Prepare gelatin:

    Dissolve gelatin in warm water. Let it sit for 5 minutes.

    3. Make the filling:

    Beat cream cheese until smooth. Add condensed milk and vanilla. Mix well. Microwave the gelatin for 10–15 seconds until fully dissolved, then slowly mix it into the cream cheese mixture.

    4. Assemble:

    Pour filling over the chilled crust. Smooth the top. Refrigerate for at least 4 hours (or overnight) until firm.

    5. Decorate:

    Drizzle caramel sauce on top. Sprinkle chocolate chips and chopped nuts.

    6. Serve:

    Slice and enjoy!

  • Berry Bread Pudding

    Berry Bread Pudding

    Ingredients:

    • 4 cups bread cubes

    • 1 cup milk

    • 1/2 cup heavy cream

    • 2 eggs

    • 1/3 cup sugar

    • 1 tsp vanilla

    • 1 cup mixed berries (strawberries, blueberries, raspberries, blackberries)

    Instructions:

    1. Preheat oven to 180°C (350°F)

    . 2. Place bread cubes in a baking dish and add berries on top.

    3. In a bowl, whisk milk, cream, eggs, sugar, and vanilla.

    4. Pour mixture over bread and berries.

    5. Bake for 35–40 minutes until golden.

    6. Let cool slightly and serve warm.

  • Recipe for a Gluten-Free, Low-Sugar Dessert That Will Help You Lose Weight!

    Recipe for a Gluten-Free, Low-Sugar Dessert That Will Help You Lose Weight!

    A great option for a gluten-free, low-sugar dessert that can help with weight loss is a Chia Seed. It’s nutritious, filling, and easy to make! Here’s a simple recipe:

    Ingredients:

    • 1/4 cup chia seeds
    • 1 cup unsweetened  almond milk (or any other plant-based  milk)
    • 1 teaspoon vanilla extract
    • 1 tablespoon sweetener of your choice (like stevia or erythritol, optional)
    • Fresh fruits for topping (like berries or sliced bananas)

    Instructions:

    1. Mix Ingredients: In a bowl, combine the chia seeds, almond milk, vanilla extract, and sweetener (if using). Stir well to ensure there are no clumps.
    2. Let It Sit: Allow the mixture to sit for about 5-10 minutes, then stir again to prevent the seeds from clumping together.
    3. Refrigerate: Cover the bowl and refrigerate for at least 2 hours, or overnight. The chia seeds will absorb the liquid and create a pudding-like texture.
    4. Serve: Once set, give it a good stir, and serve it in bowls or jars. Top with your favorite fresh fruits for added flavor and nutrients.

    This dessert is not only gluten-free and low in sugar, but it’s also packed with fiber and healthy fats, making it a satisfying option that can support your weight loss goals! Enjoy!

  • Chicken and Buttered Noodles in One Pan

    Chicken and Buttered Noodles in One Pan

    Introduction
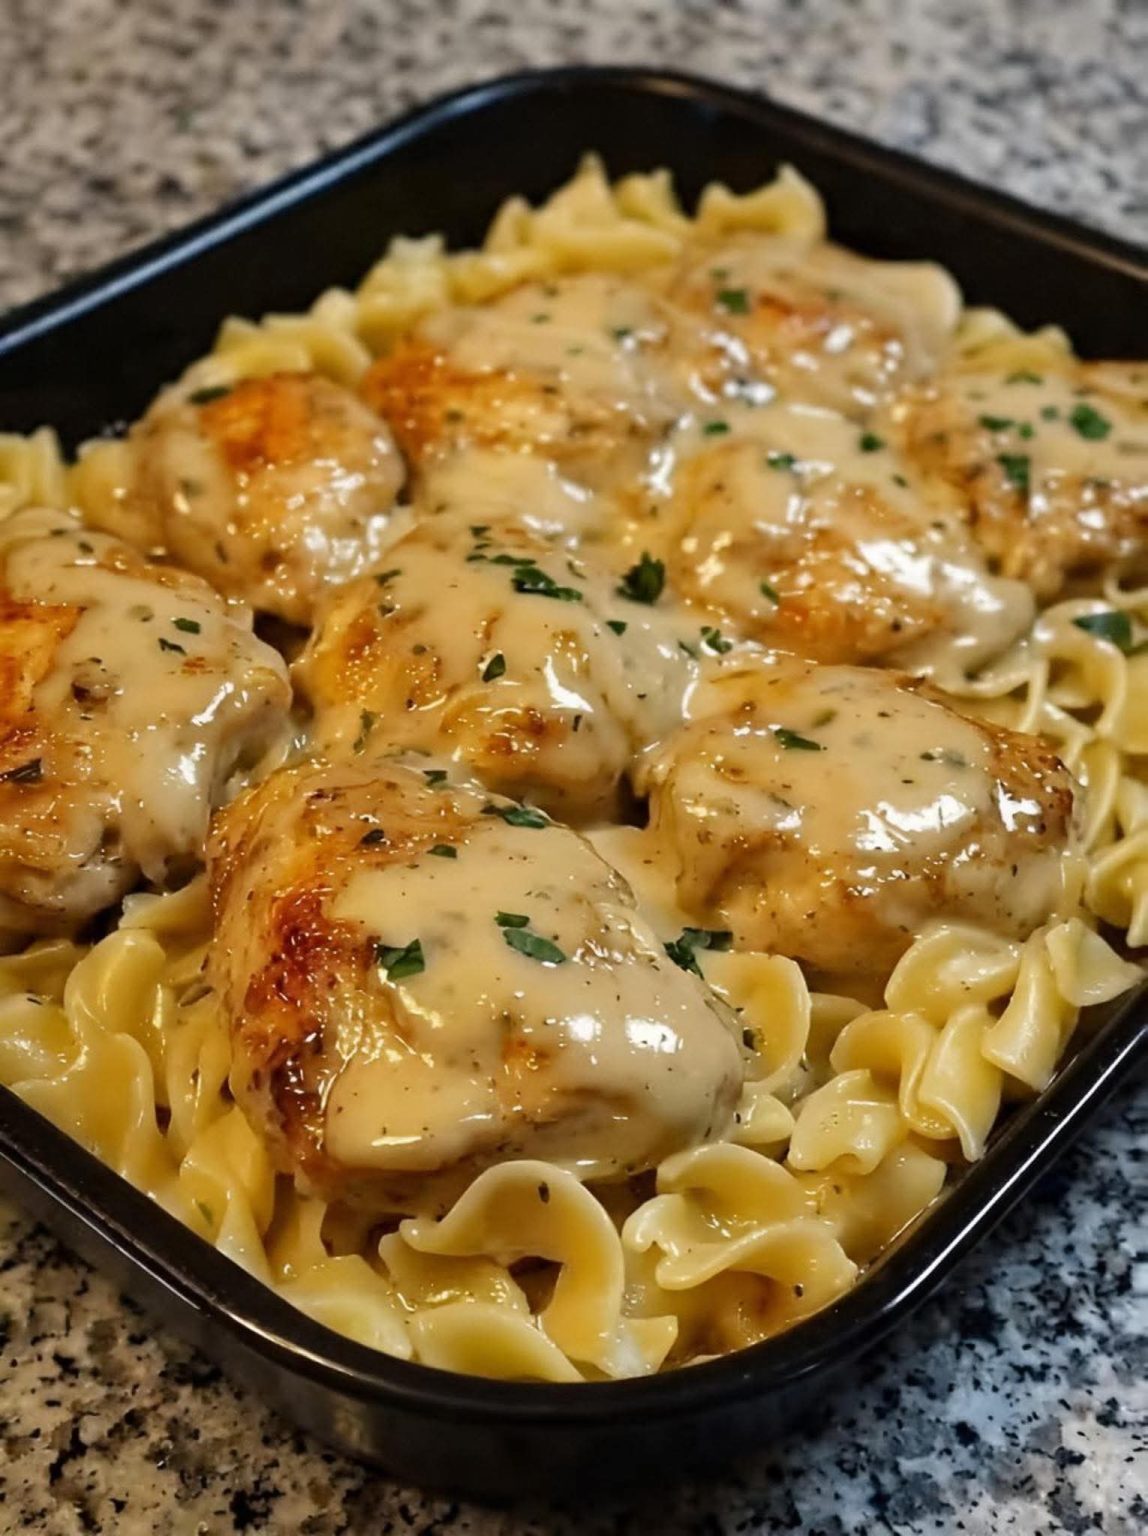
    Chicken and Buttered Noodles in One Pan is a dish that represents everything comforting about home-style cooking. It is warm, filling, and made with simple ingredients that most kitchens already have on hand. This recipe focuses on gentle flavors, smooth textures, and a satisfying balance between tender chicken and soft noodles coated in butter. The one-pan method is not only practical but also essential to the flavor, as it allows the noodles to cook directly in the seasoned broth and absorb every bit of richness along the way. Unlike complicated pasta dishes that rely on heavy sauces, this recipe builds flavor naturally through layering and timing. It is ideal for busy families, late dinners, or anyone who wants a dependable meal without sacrificing taste. The result is a comforting dish that feels nostalgic, approachable, and timeless, while still being suitable for modern cooking routines and online recipe publishing.

    Ingredients

    • Chicken breast or chicken thighs, boneless and skinless, cut into evenly sized bite-sized pieces
    • Egg noodles, wide or medium, uncooked
    • Butter, unsalted, divided into multiple portions
    • Olive oil, for sautéing
    • Chicken broth, low sodium preferred for better control of seasoning
    • Onion, finely chopped
    • Garlic, minced
    • Salt, adjusted gradually throughout cooking
    • Black pepper, freshly ground
    • Dried parsley or fresh parsley, finely chopped
    • Optional Parmesan cheese, freshly grated, for serving
    • Optional lemon juice, used sparingly to brighten flavors
    • Optional red pepper flakes, for gentle warmth
    • Optional garlic powder, for extra depth

    Preparation Steps
    Begin by choosing a large, deep skillet or sauté pan with enough surface area to allow the chicken to brown properly while still holding the noodles later. Place the pan over medium heat and add a drizzle of olive oil along with one tablespoon of butter. Let the butter melt slowly, forming a lightly foamy base that will help develop flavor without burning.

    Add the chicken pieces in a single layer, making sure not to overcrowd the pan. Lightly season with salt and black pepper. Allow the chicken to cook undisturbed for several minutes so it can develop a light golden color. This step is important because it adds depth and helps seal in moisture. Stir gently and continue cooking until the chicken is fully cooked through. Remove the chicken from the pan and set it aside on a plate, keeping any juices that collect.

    In the same pan, add a little more butter if needed. Add the chopped onion and cook slowly, stirring often, until it becomes soft and translucent. This process releases the natural sweetness of the onion and builds a flavorful base for the dish. Add the minced garlic and cook briefly, stirring constantly, just until fragrant. Avoid browning the garlic, as this can overpower the delicate flavor of the buttered noodles.

    Pour the chicken broth into the pan gradually, using a spoon to gently scrape up any browned bits stuck to the bottom. These bits carry concentrated flavor and will enrich the broth as it heats. Bring the liquid to a gentle boil, then add the uncooked egg noodles. Stir well to ensure the noodles are evenly distributed and mostly submerged in the liquid.

    Reduce the heat to a steady simmer and allow the noodles to cook uncovered. Stir occasionally to prevent sticking and to help the noodles cook evenly. As the noodles soften, they will absorb the broth and release starch, naturally thickening the liquid into a light, glossy sauce. Continue cooking until the noodles are tender but not mushy and the liquid has reduced to a smooth, buttery consistency.

    Return the cooked chicken and any reserved juices to the pan. Add the remaining butter in small portions, stirring gently until it melts completely and coats the noodles and chicken evenly. Taste and adjust seasoning with additional salt, black pepper, or a pinch of garlic powder if desired. Sprinkle with parsley and add a very small amount of lemon juice if you want a subtle brightness to balance the butter.

    Serving Suggestions
    Serve Chicken and Buttered Noodles hot, straight from the pan, for a comforting and rustic presentation. This dish works well as a complete meal on its own, but it also pairs nicely with a light side. A simple green salad with a mild vinaigrette provides contrast, while steamed vegetables such as green beans, peas, or broccoli complement the richness of the noodles. For those who enjoy extra flavor, freshly grated Parmesan cheese can be offered at the table. The mild nature of this dish makes it especially appealing to families and guests of all ages.

    Tips for Best Results
    Always cut the chicken into uniform pieces to ensure even cooking. Use low-sodium broth so you can control the seasoning throughout the process. Stir the noodles gently and regularly to prevent clumping or sticking to the pan. If the noodles absorb the liquid too quickly before becoming tender, add a small splash of warm broth rather than cold liquid. Allow the dish to rest for a few minutes after cooking so the sauce can settle and coat everything evenly.

    Variations
    This recipe is highly adaptable and can be adjusted based on personal preference or what you have available. Add vegetables such as mushrooms, spinach, peas, or sweet corn during the final minutes of cooking for added texture and color. Chicken thighs can be used instead of chicken breast for a richer flavor. For a subtle herbal note, dried thyme or Italian seasoning can be added to the broth. If a slightly creamier texture is desired, a small splash of milk can be stirred in at the end without overpowering the dish.

    Make-Ahead and Storage
    Chicken and Buttered Noodles can be prepared ahead of time and stored in an airtight container in the refrigerator for up to three days. When reheating, warm gently over low heat or in the microwave, adding a small amount of broth or water to restore moisture. Stir well before serving to ensure the butter and sauce are evenly distributed.

    Why This Recipe Works
    The success of this dish lies in its simplicity and technique. Cooking everything in one pan allows flavors to build naturally, while the butter and broth work together to create a smooth, comforting finish. The noodles absorb the seasoned liquid, making every bite flavorful without the need for heavy sauces or complex ingredients.

    Conclusion
    Chicken and Buttered Noodles in One Pan is a dependable, comforting recipe that delivers warmth and satisfaction with minimal effort. Its simple ingredients, flexible preparation, and rich flavor make it a dish that can be enjoyed again and again. Whether served fresh or reheated as leftovers, it remains smooth, balanced, and deeply comforting.

    Disclaimer
    This recipe and accompanying story are provided for general informational and entertainment purposes only.