• Simon laughed, thinking this was just another audition, until the first note hit

    Simon laughed, thinking this was just another audition, until the first note hit

    Simon laughed, thinking this was just another audition, until the first note hit, The second he opened his mouth, the entire room changed, Simons smirk disappeared, replaced by wide-eyed disbelief, Gasps rippled through the audience, the judges sat frozen, jaws dropping lower with every second, Was this even real? What happened next left the entire theater in stunned silence

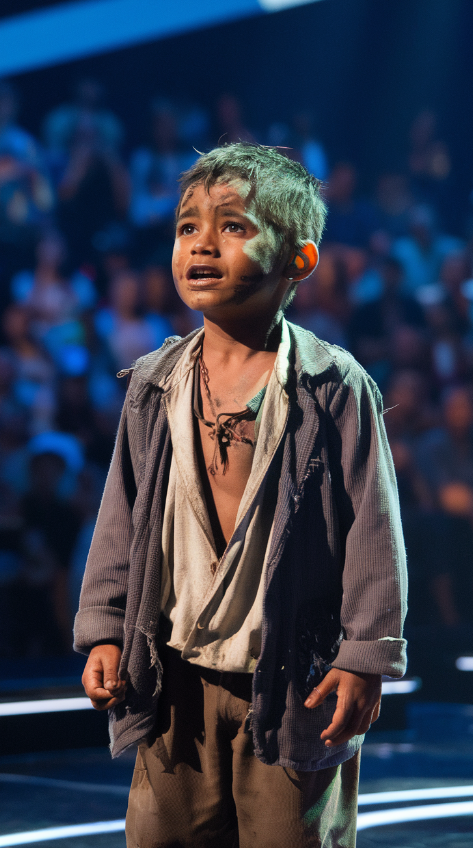
    The stage was silent as the contestant stepped forward, gripping the microphone with steady hands. He was young, too young for the deep, impossible voice that would soon leave the entire theater in shock.

    Simon leaned back in his chair, smirking as he glanced at the audition form. “And what will you be singing today?”

    The contestant smiled. “Tennessee Ernie Ford’s ‘Sixteen Tons.’”

    A chuckle rippled through the audience. Simon raised an eyebrow, amused. A kid taking on such a deep, legendary song? This was going to be interesting.

    Then, the  music started.

    And in an instant, the entire room shifted.

    The first note hit, and the smirk vanished from Simon’s face. The contestant’s voice wasn’t just good—it was unreal. Deep, soulful, rich with emotion beyond his years. The audience gasped. One judge’s hand flew to their mouth, eyes widening in disbelief.

    Simon leaned forward, his expression frozen in shock. This wasn’t what he had expected. Not even close.

    The boy sang effortlessly, his voice carrying through the theater with the weight of a seasoned artist. The low, rumbling tones vibrated through the air, sending chills down every spine in the room. People exchanged stunned glances, whispering in awe.

    By the time he reached the chorus, the energy in the room had transformed. The audience, initially lighthearted and doubtful, was now on their feet. Cheers broke out before the song even ended.

    Then came the final note—a perfect, lingering finish that left the room breathless.

    Silence.

    And then—thunderous applause.

    Simon shook his head in disbelief, still processing what he had just witnessed. He leaned toward his mic, exhaling. “That… was unexpected.”

    The contestant simply smiled.

    The world had just witnessed something unforgettable.

  • “My Nana and aunties used to make this when I was young”

    “My Nana and aunties used to make this when I was young”

    This Amish-inspired baked custard is a delicious and straightforward dessert. It requires minimal ingredients and comes together quickly, making it perfect for any occasion.

    Easy Amish Baked Custard:

    Ingredients:

    IngredientQuantity
    Sweetened Condensed Milk14 ounces
    Eggs6
    Hot Water4 cups
    Salt¼ teaspoon
    Vanilla Extract2 teaspoons
    Ground NutmegTo garnish (optional)

    Instructions:

    1. Preheat and Prep (10 minutes):
      • Preheat your oven to 325°F (163°C).
      • Grease a 2-quart baking dish or individual ramekins with butter or non-stick spray.
    2. Mix the Custard (5 minutes):
      • In a large mixing bowl, whisk together the sweetened condensed milk, eggs, hot water, salt, and vanilla extract.
      • Whisk until everything is well combined and smooth.
    3. Pour and Bake (45-60 minutes):
      • Pour the custard mixture into the prepared baking dish or divide it evenly among ramekins.
      • Place the baking dish or ramekins in a larger baking pan.
      • Carefully pour hot water into the larger pan until it reaches about halfway up the sides of the custard dish.
      • Bake the custard in the preheated oven for 45-60 minutes, or until a knife inserted into the center comes out clean. The custard should be set but still slightly jiggly in the center.
    4. Cool and Garnish (at least 2 hours):
      • Carefully remove the custard from the oven and take the baking dish or ramekins out of the water bath.
      • Let the custard cool to room temperature, then refrigerate for at least 2 hours before serving.
      • Before serving, sprinkle a light dusting of ground nutmeg over the top for an extra touch (optional).
  • Giant Muffaletta Italian Sandwich

    Giant Muffaletta Italian Sandwich

    A classic New Orleans  Muffaletta sandwich packed with Italian cold cuts,  cheeses, and a tangy olive  salad, all in a hearty round Italian loaf. Perfect for gatherings!

    Groceries

    Ingredients:

    1 large round Italian bread loaf (about 10 inches in diameter)

    1/4 cup olive oil

    1 tsp dried oregano

    1 tsp dried basil

    1/4 lb thinly sliced turkey ham

    1/4 lb thinly sliced beef salami

    1/4 lb thinly sliced mortadella

    1/4 lb sliced provolone cheese

    1/4 lb sliced mozzarella cheese

    1 cup olive salad (store-bought or homemade)

    1/4 cup sliced pepperoncini peppers (optional)

    Instructions:

    Cut the bread loaf in half horizontally to create top and bottom halves.

    In a small bowl, whisk together olive oil, red grape juice, oregano, and basil.

    On the bottom half of the bread, layer ingredients in this order: turkey ham, beef salami, mortadella, provolone, and mozzarella.

    Spread the olive salad evenly over the cheese layer. If using, add pepperoncini peppers on top.

    Place the top half of the bread on the sandwich and press down gently.

    Wrap the entire sandwich tightly in plastic wrap.

    Place a heavy weight (like a cast-iron skillet) on top of the wrapped sandwich and refrigerate for at least 2 hours or overnight.

    This helps compress the sandwich and allows flavors to meld.

    Before serving, unwrap the sandwich and cut it into wedges.

    Tips:

    For extra flavor, let the sandwich sit overnight.

    Use a sharp knife to get clean wedges.

    Perfect for picnics or a hearty lunch!

    Enjoy!

  • This lump can appear due to something you do every day

    This lump can appear due to something you do every day

    A lump on your hand can be caused by several everyday activities or conditions. Here are a few common reasons:

    1. Ganglion Cyst: These are fluid-filled sacs that often develop on the wrist or hand, typically due to repetitive motions or joint irritation. They can appear suddenly and may fluctuate in size.
    2. Tendonitis: Overuse of the hand or wrist, especially from repetitive tasks like typing or using tools, can lead to inflammation of the tendons, causing swelling and lumps.
    3. Calluses: If you frequently use your hands for manual work, you might develop calluses, which are thickened areas of skin that can feel like lumps.
    4. Injury: A minor injury or trauma to the hand, even if it seems insignificant at the time, can lead to swelling or a lump as the body responds to heal the area.
    5. Bursitis: Inflammation of the bursae (small fluid-filled sacs that cushion bones) in the hand can also lead to lumps.

    If the lump is painful, persistent, or changing in size, it’s a good idea to consult a healthcare professional for an accurate diagnosis and appropriate treatment.

    To keep your hands healthy and prevent lumps or other issues, consider the following tips:

    1. Proper Ergonomics: Make sure your workstation is set up ergonomically. Use a chair and desk that promote good posture, and keep your wrists in a neutral position when typing or using a mouse.
    2. Take Breaks: If you perform repetitive tasks, take regular breaks to stretch and relax your hands. This helps reduce strain on your muscles and tendons.
    3. Strengthening Exercises: Incorporate hand and wrist strengthening exercises into your routine. Simple exercises like squeezing a stress ball or using resistance bands can help.
    4. Stay Hydrated: Drinking enough water helps maintain your body’s overall health, including the health of your skin and joints.
    5. Moisturize: Regularly apply lotion to your hands to keep the skin hydrated, especially if you work with your hands a lot or are exposed to harsh conditions.
    6. Protect Your Hands: If you’re doing manual work or activities that might cause injury, wear protective gear like gloves to minimize the risk of trauma.
    7. Listen to Your Body: If you start feeling pain or notice any lumps, don’t ignore them. Early intervention can prevent more serious issues.

    By following these tips, you can help maintain the health of your hands and reduce the risk of developing lumps or other problems. If you have any specific concerns or symptoms, it’s best to consult a healthcare professional.

  • No bake Chocolate Eclair Cake

    No bake Chocolate Eclair Cake

    This may be the easiest no bake dessert ever (but no one has to know). Simply layer instant pudding and graham crackers and top with a simple chocolate ganache and let the fridge do all the work. It’s a dessert the whole family will love!

    Ingredients:

    2 (3.5 oz) package of instant vanilla pudding mix

    1 (8 oz) container of whipped topping (COOL WHIP) thawed

    3 cups milk

    2 sleeves graham cracker squares

    1 (16 oz) tub chocolate frosting

    Instuctions:

    In a medium bowl, mix together the pudding mix, milk and Cool Whip.

    In an 9 x 13 baking dish, arrange a single layer of graham cracker squares on the bottom. You may have to break them up a bit to get enough crackers to cover the bottom of your dish.

    Spread half of the pudding mixture on top of the crackers.

    Layer another layer of graham crackers over the pudding mixture.

    Then layer the other half of the pudding mixture on top of crackers.

    Top with a final layer of graham crackers.

    Put plastic wrap over dish and put in fridge for about 30 min to an hour to allow pudding to set.

    When ready, put the tub of chocolate frosting in the microwave for about 15 seconds to soften (remove lid and aluminum foil top before microwaving).

    Take out and stir frosting. It should be easily spreadable now.
    Remove plastic wrap from dish and evenly spread chocolate frosting all over the top layer of graham crackers.

    Place plastic wrap over top of dish and put back in fridge and let it chill overnight.

    This dessert gets better over time. The graham crackers need plenty of time to soften up.

    When ready, slice and serve!

    Enjoy!

  • Crispy Bang Bang Salmon Bites

    Crispy Bang Bang Salmon Bites

    Crispy bang bang salmon bites pair beautifully with pickled cucumbers, steamed rice, broccoli, and avocado! These magical bowls give you everything you need in a complete meal: protein, omega 3 fats, fiber, complex carbs, micronutrients and deliciousness!

    Ingredients:

    For the Salmon Bites:

    1 1/2 pounds salmon fillets (skin removed, cut into bite-sized pieces)

    1 tablespoon olive oil

    1 teaspoon garlic powder

    1 teaspoon onion powder

    1 teaspoon smoked paprika

    1/2 teaspoon salt

    1/2 teaspoon black pepper

    1/4 teaspoon cayenne pepper (optional, for extra heat)

    For the Bang Bang Sauce:

    1/2 cup mayonnaise

    1/4 cup Thai sweet chili sauce

    1 tablespoon sriracha sauce (adjust for preferred heat level)

    1 tablespoon honey

    1 tablespoon lime juice (freshly squeezed)

    Optional Garnish:

    Fresh parsley or cilantro, chopped

    Green onions, sliced

    Sesame seeds

    Instructions:

    Prep the Salmon

    Pat the salmon fillets dry with paper towels to ensure a crispy texture.

    Remove any skin and cut the salmon into 1-inch bite-sized cubes.

    Place the salmon pieces in a large bowl. Drizzle with olive oil and sprinkle with garlic powder, onion powder, smoked paprika, salt, black pepper, and cayenne pepper (if using).

    Toss gently to coat the salmon evenly with the seasoning.

    Make the Bang Bang Sauce

    In a small mixing bowl, whisk together mayonnaise, Thai sweet chili sauce, sriracha, honey, and lime juice until smooth and creamy.

    Taste and adjust the sauce—add more sriracha for heat or honey for sweetness. Set aside.

    Cook the Salmon

    Heat a large non-stick skillet over medium-high heat and add a small amount of olive oil to prevent sticking.

    Once the oil is hot, add the salmon pieces in a single layer, making sure not to overcrowd the pan. Work in batches if needed.

    Enjoy!

  • Sourdough Pancakes

    Sourdough Pancakes

    These Sourdough Pancakes use an active sourdough starter to create pancakes that are light, fluffy, and full of flavor with just the right amount of tanginess. The natural fermentation process of the starter not only gives the pancakes their signature mild sour flavor but also makes them easier to digest and more nutritious. Using an active starter ensures that the batter becomes airy and bubbly, giving the pancakes a perfect rise and a soft, tender texture inside.

    To achieve the best results, the batter is typically made with a combination of flour, milk, eggs, melted butter, and a bit of sugar for balance. The key ingredient that brings everything together is the sourdough starter — it acts as both a leavening agent and a flavor enhancer. As the batter rests, the live cultures in the starter feed on the flour and create tiny bubbles, which make the pancakes rise beautifully when cooked.

    Just before cooking, a small amount of baking soda is added to the mix. This step is crucial because it reacts with the natural acidity of the sourdough starter, producing carbon dioxide that gives the pancakes their final lift. The reaction happens quickly, so it’s best to cook the pancakes immediately after adding the baking soda to capture that light and airy texture.

    When cooked on a hot griddle or skillet, the pancakes develop a golden-brown surface with crisp edges while staying fluffy and moist inside. The subtle tang from the sourdough pairs perfectly with sweet toppings like maple syrup, honey, or fresh fruit, as well as savory options like butter, bacon, or even a drizzle of yogurt.

    These sourdough pancakes are a wonderful way to use excess starter and bring a wholesome, old-fashioned touch to breakfast. They combine the best of traditional pancake comfort with the rich character of sourdough baking, making every bite satisfying and memorable. Whether you’re feeding your family on a weekend morning or enjoying a slow brunch, these pancakes will fill your kitchen with warmth and that irresistible aroma of freshly cooked batter.

    Ingredients:

    IngredientQuantity
    Active sourdough starter2 cups
    Eggs2
    Coconut oil, melted1/4 cup
    Honey2 tablespoons
    Salt1/2 teaspoon
    Baking soda1 teaspoon
    Coconut oilFor frying

    How To Make Sourdough Pancakes:

    1. Step 1: Combine Wet Ingredients and Flavor: Mix the 2 cups active sourdough starter, 2 eggs, 1/4 cup melted coconut oil, 2 tablespoons honey, and 1/2 teaspoon salt in a large mixing bowl until well combined.
    2. Step 2: Add Baking Soda: Add the 1 teaspoon baking soda last and stir just until incorporated. The starter should foam up slightly from the reaction.
    3. Step 3: Preheat Skillet: Preheat a tablespoon of coconut oil in a cast iron skillet (or other heavy-bottomed pan) on medium heat.
    4. Step 4: Cook First Side: Once the oil is hot enough to sizzle, pour 1/2 cup batter right onto the hot oil. Immediately turn the stove down to medium-low heat so that the pancake has a chance to cook through without burning the bottom. Cook until the top is nice and bubbly and no more bubbles are being produced (about 2-3 minutes).
    5. Step 5: Flip and Finish: Give the pancake one flip. Cook the second side for another 30 seconds to 1 minute on the other side, or until cooked through and golden brown.
    6. Step 6: Serve: Set the cooked pancake aside and continue with the remaining batter. Serve warm with butter, maple syrup, fresh fruit, homemade whipped cream, or any desired toppings.
  • Steam Custard Cake

    Steam Custard Cake

    Steam custard cake is a soft and moist dessert that is typically made with a combination of eggs, sugar, flour, and milk or coconut milk. This cake is unique because it is steamed rather than baked, which gives it a delicate texture and a rich flavor.

    Key Characteristics:

    • Texture: The steaming process results in a light and fluffy cake that is very moist.
    • Flavor: It often has a creamy, custard-like flavor, which can be enhanced with ingredients like vanilla or pandan.
    • Serving: It can be served plain or topped with fruits, whipped cream, or a drizzle of syrup.

    Steam custard cake is popular in various Asian cuisines and is often enjoyed as a snack or dessert. If you want a detailed recipe or tips on making it, just let me know!

    Here’s a simple recipe for steam custard cake:

    Ingredients:

    • 4 large eggs
    • 100g (1/2 cup) granulated sugar
    • 100g (3/4 cup) all-purpose flour
    • 200ml (3/4 cup) milk (you can use coconut milk for extra flavor)
    • 1 teaspoon vanilla extract (optional)
    • A pinch of salt

    Instructions:

    1. Prepare the Steamer:
    • Fill a pot with water and bring it to a simmer. If you have a steamer, set it up above the simmering water.
    1. Mix the Batter:
    • In a mixing bowl, whisk the eggs and sugar together until the mixture is light and frothy.
    • Gradually sift in the flour and salt, mixing until combined.
    • Slowly add the milk and vanilla extract, stirring until the batter is smooth.
    1. Prepare the Cake Dish:
    • Grease a heatproof dish or cake pan that fits into your steamer with a little oil or butter.
    1. Steam the Cake:
    • Pour the batter into the prepared dish and cover it with aluminum foil to prevent water from dripping onto the cake.
    • Place the dish in the steamer and steam for about 30-40 minutes, or until a toothpick inserted into the center comes out clean.
    1. Cool and Serve:
    • Once cooked, remove the cake from the steamer and let it cool for a few minutes before slicing.
    • You can serve it plain or with toppings like fresh fruit or a drizzle of syrup.

    Enjoy your steam custard cake!

  • Donut Tresse

    Donut Tresse

     donut tresse, also known as a braided donut or a twisted donut, is a type of pastry that combines the shape of a donut with a braided or twisted appearance. Typically made from a sweet yeast dough, the dough is rolled out, twisted or braided, and then fried or baked until golden brown. Afterward, it’s often coated in  sugar or glaze for added sweetness. This pastry can be filled with various fillings like cream, jam, or  custard, making it a delicious treat. If you’re interested in making one, I can help with a recipe!

    Here’s a simple recipe for donut tresse:

    Ingredients:

    • For the Dough:
    • 2 ¼ teaspoons (1 packet) active dry yeast
    • ½ cup warm milk (about 110°F or 43°C)
    • ¼ cup granulated sugar
    • 2 large eggs
    • ¼ cup unsalted butter, melted
    • ½ teaspoon salt
    • 3 to 4 cups all-purpose flour
    • For Frying:
    • Vegetable oil (for frying)
    • For the Glaze (optional):
    • 1 cup powdered sugar
    • 2-3 tablespoons milk
    • ½ teaspoon vanilla extract

    Instructions:

    1. Activate the Yeast:
    • In a small bowl, combine warm milk and yeast. Let it sit for about 5-10 minutes until frothy.
    1. Mix the Dough:
    • In a large mixing bowl, combine the yeast mixture, sugar, eggs, melted butter, and salt. Mix well.
    • Gradually add flour, one cup at a time, mixing until a soft dough forms. You may need 3 to 4 cups of flour, depending on the humidity.
    1. Knead the Dough:
    • Turn the dough onto a floured surface and knead for about 5-7 minutes until smooth and elastic.
    1. First Rise:
    • Place the dough in a greased bowl, cover it with a clean cloth, and let it rise in a warm place for about 1 hour or until doubled in size.
    1. Shape the Donuts:
    • Once the dough has risen, punch it down and divide it into equal pieces (about 8-10).
    • Roll each piece into a long rope (about 12 inches long) and then braid or twist two ropes together to form a donut shape. Pinch the ends to seal.
    1. Second Rise:
    • Place the shaped donuts on a greased baking sheet, cover them, and let them rise for another 30 minutes.
    1. Fry the Donuts:
    • Heat vegetable oil in a deep fryer or a large pot to 350°F (175°C).
    • Carefully place the donuts in the hot oil, frying a few at a time until golden brown on both sides (about 2-3 minutes per side). Remove and drain on paper towels.
    1. Glaze (optional):
    • In a bowl, mix powdered sugar, milk, and vanilla extract until smooth. Dip the warm donuts in the glaze and let them set on a wire rack.

    Enjoy your delicious donut tresse! Let me know if you need any more help with the recipe or cooking tips!

  • Beat the condensed milk with the bread! I make this dessert for years in 5 minutes!

    Beat the condensed milk with the bread! I make this dessert for years in 5 minutes!

    A classic bread pudding recipe is a comforting dessert made from stale bread, milk, eggs, sugar, and spices. Here’s a simple recipe to make it:

    Ingredients:

    • 6 cups of cubed stale bread (French bread or brioche works well)
    • 2 cups of milk
    • 1 cup of heavy cream
    • 4 large eggs
    • 3/4 cup of sugar
    • 1 tablespoon of vanilla extract
    • 1 teaspoon of ground cinnamon
    • A pinch of salt
    • Optional: raisins or chocolate chips for added flavor

    Instructions:

    1. Preheat Oven: Preheat your oven to 350°F (175°C).
    2. Prepare Bread: If your bread is not stale, you can dry it out in the oven for about 10 minutes. Then, place the cubed bread in a large mixing bowl.
    3. Make the Custard: In another bowl, whisk together the milk, heavy cream, eggs, sugar, vanilla extract, cinnamon, and salt until well combined.
    4. Combine: Pour the custard mixture over the cubed bread, ensuring all pieces are soaked. If you’re using raisins or chocolate chips, fold them in at this stage.
    5. Transfer to Baking Dish: Grease a baking dish (about 9×13 inches) and pour the bread mixture into it, spreading it evenly.
    6. Bake: Bake in the preheated oven for about 45-55 minutes, or until the pudding is set and the top is golden brown.
    7. Cool and Serve: Let it cool for a few minutes before serving. It can be enjoyed warm or at room temperature, often with a drizzle of caramel sauce or a scoop of ice cream.

    This classic dessert is perfect for using up leftover bread and makes for a deliciously warm treat!